RAW converter
 Modern digital photography is very much associated with image processing programs. Sometimes, just the photo editor creates exactly that photo, which we ultimately consider the work of the photographer.
Modern digital photography is insidious, sometimes it turns into ordinary mathematical tricks, which I already wrote about in the articles ‘Subpixels’, ‘Gigapixels’, ‘JPEG‘, ‘Tricks with RAW‘ and ‘Setting RAW‘. Any photograph taken in the so-called raw format – RAW, for delivery to print or view on a computer must be converted (converted) to a simpler format with an unambiguous representation of the data. Usually such a program is called RAW converter (‘rav-converter’). There are simply a lot of such converters, but, due to the specifics of the raw files of each individual camera, converters sometimes can not recreate the “correct” photo from this raw data. It is often said that for the best result you need to use exclusively “native software”, which sometimes comes with the camera.
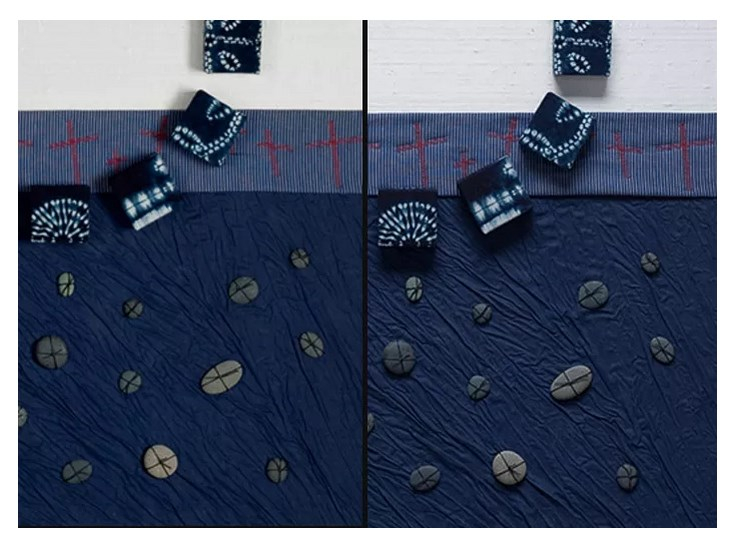
Below is described my experiment, which everyone can repeat. The essence of the experiment is very simple – you need to convert the same raw file with different converters and see what happens 🙂 The photo from the experiment was taken with Nikon Nikkor-SC Auto 1: 1.4 f = 50mm, I specifically chose a lens without microprocessor contacts to exclude any specific image enhancement by the converter by correcting lens imperfections from the database. The picture was taken in difficult lighting conditions: very cloudy weather, two flashes.
Link to the archive with photos. (The archive takes 96.9 MB to view the packed files, the archive should be unpacked). Attention: the photos are not for the faint of heart, they are especially dangerous for scammers and pixel worms 🙂
The archive contains the following files:
DSC_5549.NEF – original RAW file received during shooting. Nikon D700, 14bit, lossless compression, vignetting control, ADL, long exposure noise reduction, high ISO noise reduction – were turned off. Everything was shot in SD image management mode (standard mode): contrast correction – 0, brightness – 0, saturation – 0, hue – 0, sharpness – position 5 out of 10. White balance – “flash”. If you include all the native “improvers”, then third-party software copes with the display of data even worse. You can watch EXIF with any available program you are used to. If there is no such program, then it is easy to do this using the service at http://regex.info/exif.cgi.
DSC_5549.JPG – original JPEG file obtained during shooting RAW + JPEG, the settings are described above. JPEG L with quality priority.
DSC_5549 (acr-original) .jpg – the file is converted using Adobe Camera Raw 6.0 (ACR 6.0) in default mode.
DSC_5549 (acr-auto) .jpg – the file is converted using Adobe Camera Raw 6.0 in auto mode.
DSC_5549 (capturexn2-original) .jpg – the file is converted using CaptureNX 2 v 2.4.5 in the default mode.
DSC_5549 (capturexn2-pt) .jpg – the file is converted using CaptureNX 2 v 2.4.5 with the selected shooting mode PT.
DSC_5549 (lr-auto-tone) .jpg – the file was converted using the “naked” Adobe Photoshop Lightroom 5.2 using the ‘Auto tone’ command. When exporting to JPEG, 100% quality was used, the rest are the default settings.
DSC_5549 (lr-original) .jpg – the file is converted using the “naked” Adobe Photoshop Lightroom 5.2 in the default mode with the standard profiles installed with the LR installation. When exporting to JPEG, 100% quality was used, the rest are the default settings.
DSC_5549 (photoshop-from-original-jpeg-with-auto-levels) .jpg – this is how Photoshop “auto levels” processed by the on-camera JPEG look like.
DSC_5549 (viewnnx2-after-quick-adjust) .NEF is what ViewNX 2 did with the original RAW when setting the white balance ‘Calculate automaticaly’ and choosing the PT mode.
DSC_5549 (viewnx2-auto-pt) .JPG – ViewNX 2 when setting the white balance ‘Calculate automaticaly’ and selecting the PT mode.
DSC_5549 (viewnx2-original) .JPG – ViewNX 2 by default
DSC_5549 (inverted original jpeg) .JPG – original JPEG rotated 90 ° for viewing using the built-in utility for the WINDOWS OS
picassa-view-original-nef-file.jpg – and this is how the original RAW file looks when viewed by Google Picassa, a screenshot of the program window.
Setting up the converter is a very delicate and necessary matter.
I want to share some experience on the use of converters. I really like the way the photo displays the “native” ViewNX and CaptureNX. In order to transfer the picture as accurately as possible – since I saw it on the camera display and in life, I use the “native” converters. Refinement (retouching, color correction and other boring routine) is carried out in Photoshop. I like a bit of a sadistic mechanism: first, the basic RAW (NEF) file is basic to correct using ViewNX, export the result to TIFF (16 bits without compression), and then modify it in Photoshop.