HOW TO MAKE STYLISH BLACK AND WHITE PORTRAITS
 Tips for processing black and white images in Photoshop
After you get rid of the color in the photos, the tones in the images will still have to be controlled. We suggest that you familiarize yourself with the methodology of the photographer John McIntire, who uses Photoshop tools to create spectacular photos in b / w.
Global adjustments are changes that affect the entire image.
How to make stylish black and white portraits
This layer of curves to reduce the brightness affected the entire image, and not in a very pleasant way
Local adjustments are made for specific areas of the image. For example, you can adjust the contrast for the eyes of a portrait object and the contrast for his shirt separately.
How to make stylish black and white portraits
Using a layer mask allowed local adjustment, that is, the curve layer only affected the midtones surrounding the face of the object
In most cases, you will want to avoid the deep global settings of your images. If you think about it in terms of portraiture, imagine a person standing in front of a studio background, for example, as in the image below.
By dividing the image into key areas, and then making appropriate changes to them, you get complete control over the images
You can split the image into several parts. There is skin, eyes, a shirt, hair and the background of an object. Each of these elements reacts differently to different adjustments. Using global settings, you will change the appearance of all elements at the same time.
For example, if you want to significantly increase the contrast of the shirt to emphasize the texture, you will also increase the contrast of the skin of the object. And usually I don’t really want to increase the contrast on the skin (they even reduce it more often). How to increase the contrast of the shirt, while reducing the contrast on the skin? Through the use of local settings.
Tools for applying local settings
The right tool for the job is completely up to the job.
Layer masks
A layer mask is probably the easiest and most common way to work with local settings in Photoshop. It effectively blocks the adjustment layer (disguises it) from affecting parts of the image that you do not need.
How to make stylish black and white portraits
These masks will help you highlight specific areas of your image that you want to make adjustments to. The object hat is darkened here
In the above example, the Curves adjustment layer was made, and the layer mask was filled with black. Using a white brush (B) with 100% opacity, the photographer painted (with the layer mask pressed) on the eyes of the object. Now, no matter what is done with the curve layer, this will only affect the area that is painted white in the layer mask.
Using this technique you can create as many adjustment layers of curves as you want, or any other type of adjustment layer, each of which affects only certain parts of the image.
How to make stylish black and white portraits
Three separate curved layers with their own masks. The first two are darkened areas of the image, and the upper part illuminates the background
Highlight color range
When you work with layer masks, it is sometimes difficult to select certain areas of the image for work. One of the methods useful in this case is the Select Color Range tool (Select-> Color Range).
How to make stylish black and white portraits
Here you can see that the Select Color Range tool will add to your selection when you click on the brightest part of the image and set the blur slider to maximum
This tool will provide you with a means to highlight a specific color range in images, which you can then apply to your layer masks. Since we are talking about processing black and white images, instead of choosing colors, you will choose a tonal range.
With the dialog box open, simply click on the image area you want to work on. You can now use the slider labeled Fuzziness to determine which part of the image in this range you want to select. If you want to select only the brightest areas, click on one of them and drag the fuzzy slider to the left.
Brightness masks
For a more complex version, you can use luminosity masks. There are many ways to install them in Photoshop and using third-party plug-ins. Luminosity masks give you incredible control over black and white image processing.
How to make stylish black and white portraits
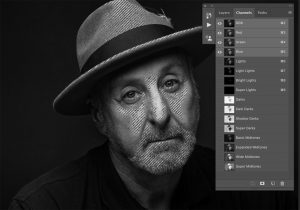
This is an example of how brightness masks can look during the retouching process. The photographer created a highlight with a Light Lights mask. Many options make it easy to select specific tonal ranges.
In short, these masks provide the ability to create layer masks for each tonal range of the image.
