HARD LIGHT – IT’S SIMPLE!
 In nature, there is soft light, hard, as well as everything in between. All this falls under the concept of “quality of light”, i.e. the differences between these two types of lighting are related to the quality of the shadows that you get when lighting an object. Hard and soft light can be reproduced using artificial lighting with a combination of flash, light modifiers and the distance at which all devices are located relative to the subject.
Hard light is just
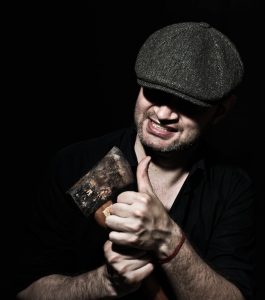
Soft light is determined by the gradual transition between shadows and highlights. Hard is its opposite. Transitions between shadows and highlights occur quickly. The result is crisp edges, deeper shadows, and sharper, sharper lighting. Hard lighting has many uses, from promotional images of a musical group, to sports, fashion, for shooting older people who need a “cool” look. In principle, for any images where you need a sharp and sharp object, it is best to use hard light.
Hard light is just
Hard lighting is typical for very dark shadows. It makes us pay less attention to black areas and more to color and what is well lit. The same theory applies to sharpness and the idea of deepening black levels in an image to give the impression that the image is sharper than it really is.
Hard light is just
Hard lighting can also be associated with high contrast. To explain this, you need to refer to the difference between the brightest and darkest areas in the image. If there is a dark area in the scene that you cannot clearly identify and bright with few details, then this is a high-contrast image.
The creation of hard light using a flash is governed by three factors. Let’s look at each of them individually.
Light modifier size
The first and most important part of the light quality puzzle is the size of the lighting modifier used. To obtain soft light, large modifiers are used. With hard lighting, of course, everything is exactly the opposite. The basic rule of thumb is that the smaller the light source, the harder it will be in quality. It follows that to obtain better results when creating hard lighting you need to use a small modifier.
It can be a beauty dish (portrait plate), a small reflector, softbox or oktoboks. Whatever modifier you choose, to achieve optimal results, the most important thing is to comply with the appropriate size. If desired, the degree of light stiffness can be easily controlled using one or more layers of diffuse tissue.
Hard light is just
The inner surface of the modifier
In addition to size, the inner surface of the modifier is important. To get bright lighting, use a modifier with a silver surface, as it increases contrast, maximizes light output and creates the sharpest edges. If you want a softer light, then you can replace it with a modifier with a white surface.
Experiment and have fun creating different degrees of hard light with the help of modifiers and their additions – there are many options for the entire spectrum of hard lighting.